Install and Create an Application
Requirements
- Sudah terinstall aplikasi sublime, jika anda belum memiliki aplikasi sublime silahkan download pada link berikut: Ikuti tutorial ini.
- Sudah terinstall aplikasi xampp, jika anda belum memiliki aplikasi xampp silahkan download pada link berikutIkuti tutorial ini.
Steps
- Silahkan download library antares php dan simpan pada lokal komputer anda dengan menekan tombol di bawah ini.
Download
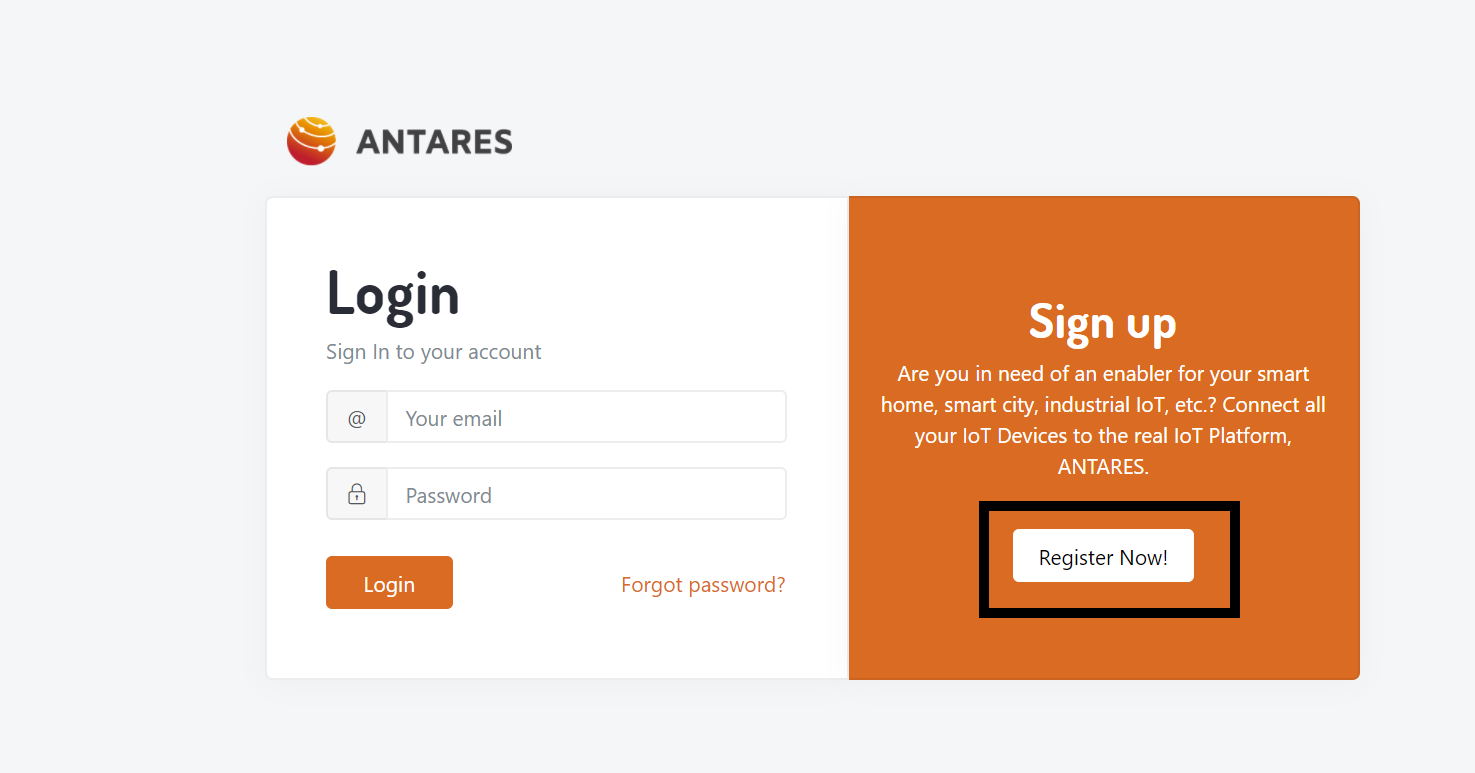
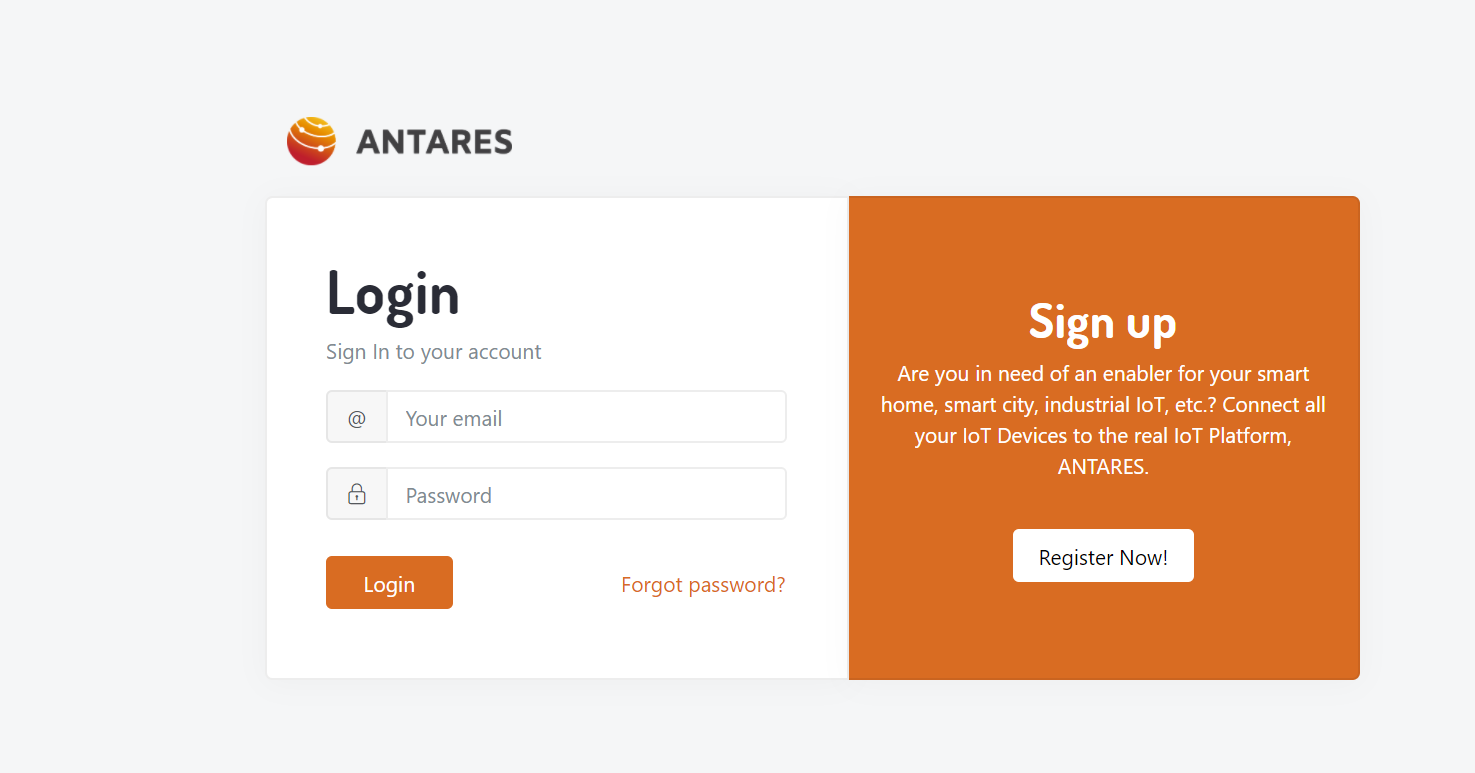
- pertama lakukan registrasi untuk membuat akun antares klik register now.
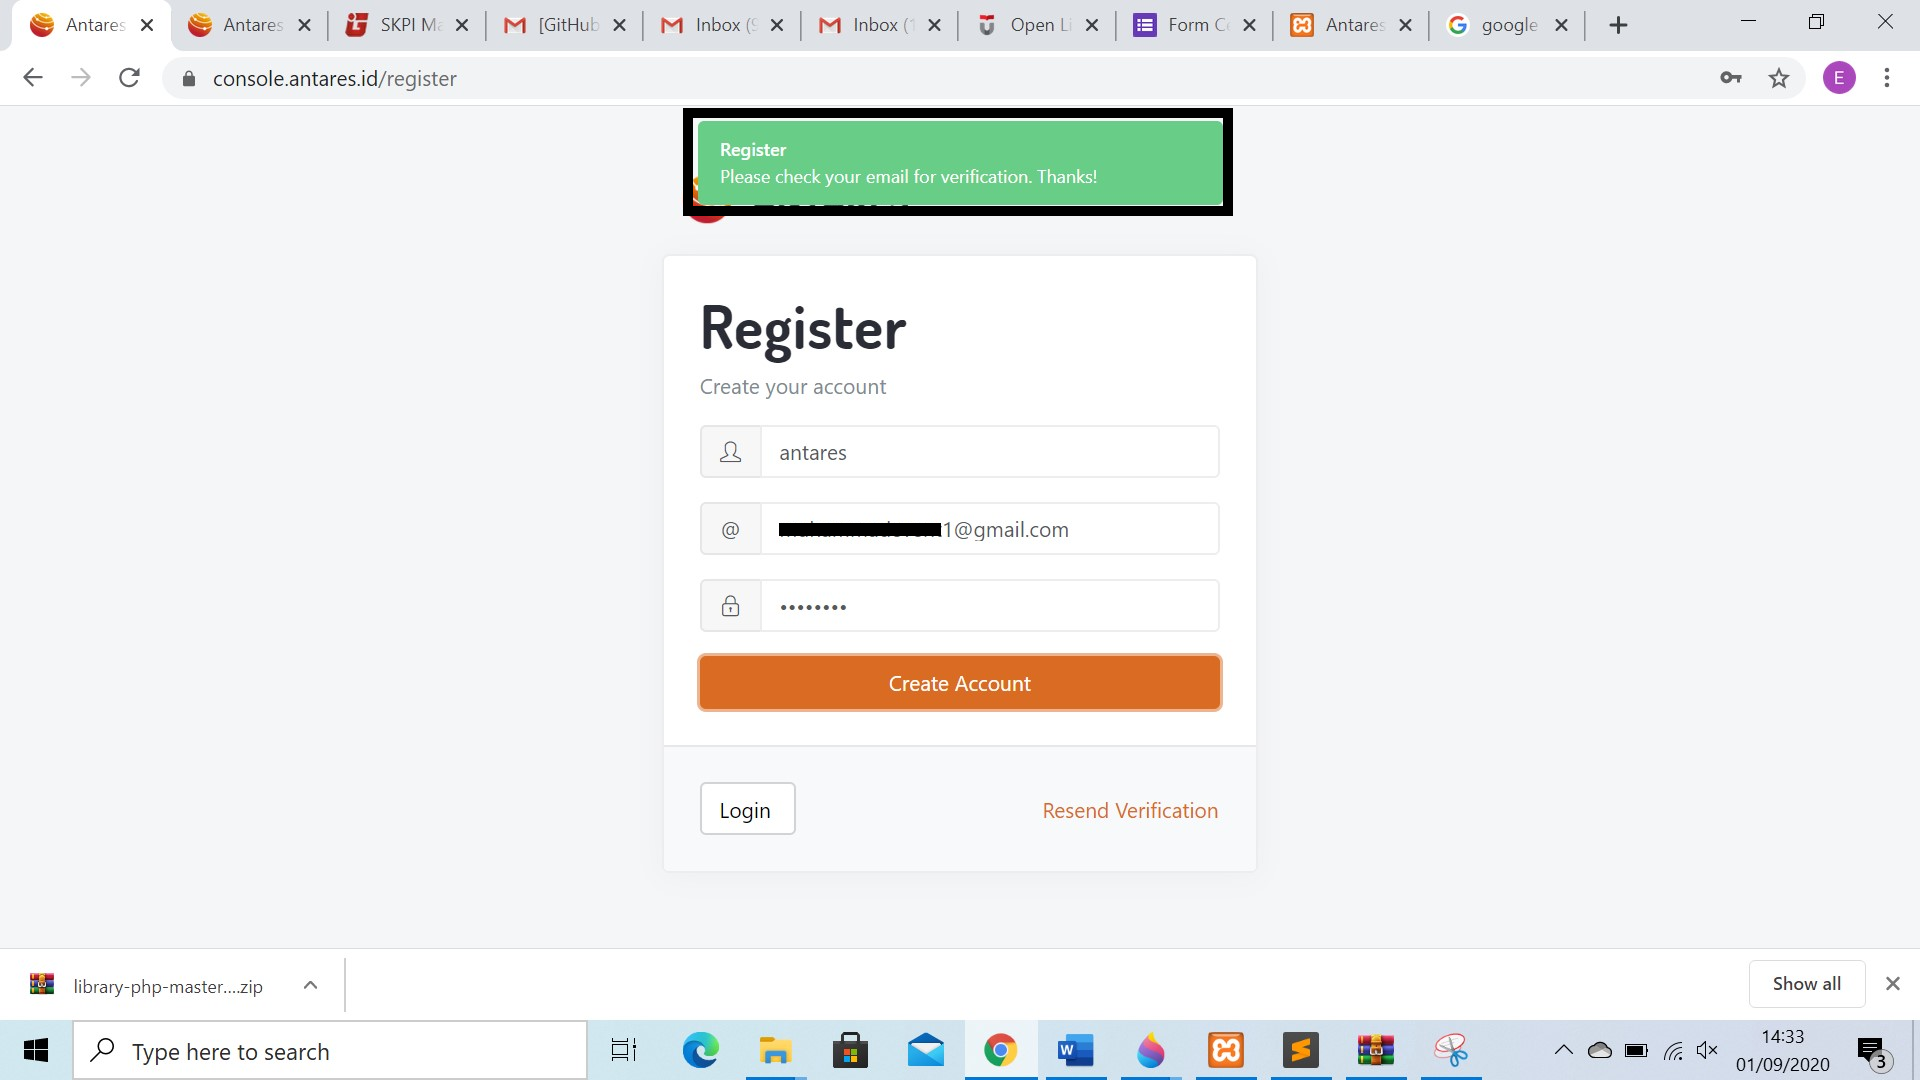
- Selanjutnya isi email, password lalu nama pada Antares dan klik tombol create account dan tunggu hingga ada pemberitahuan.
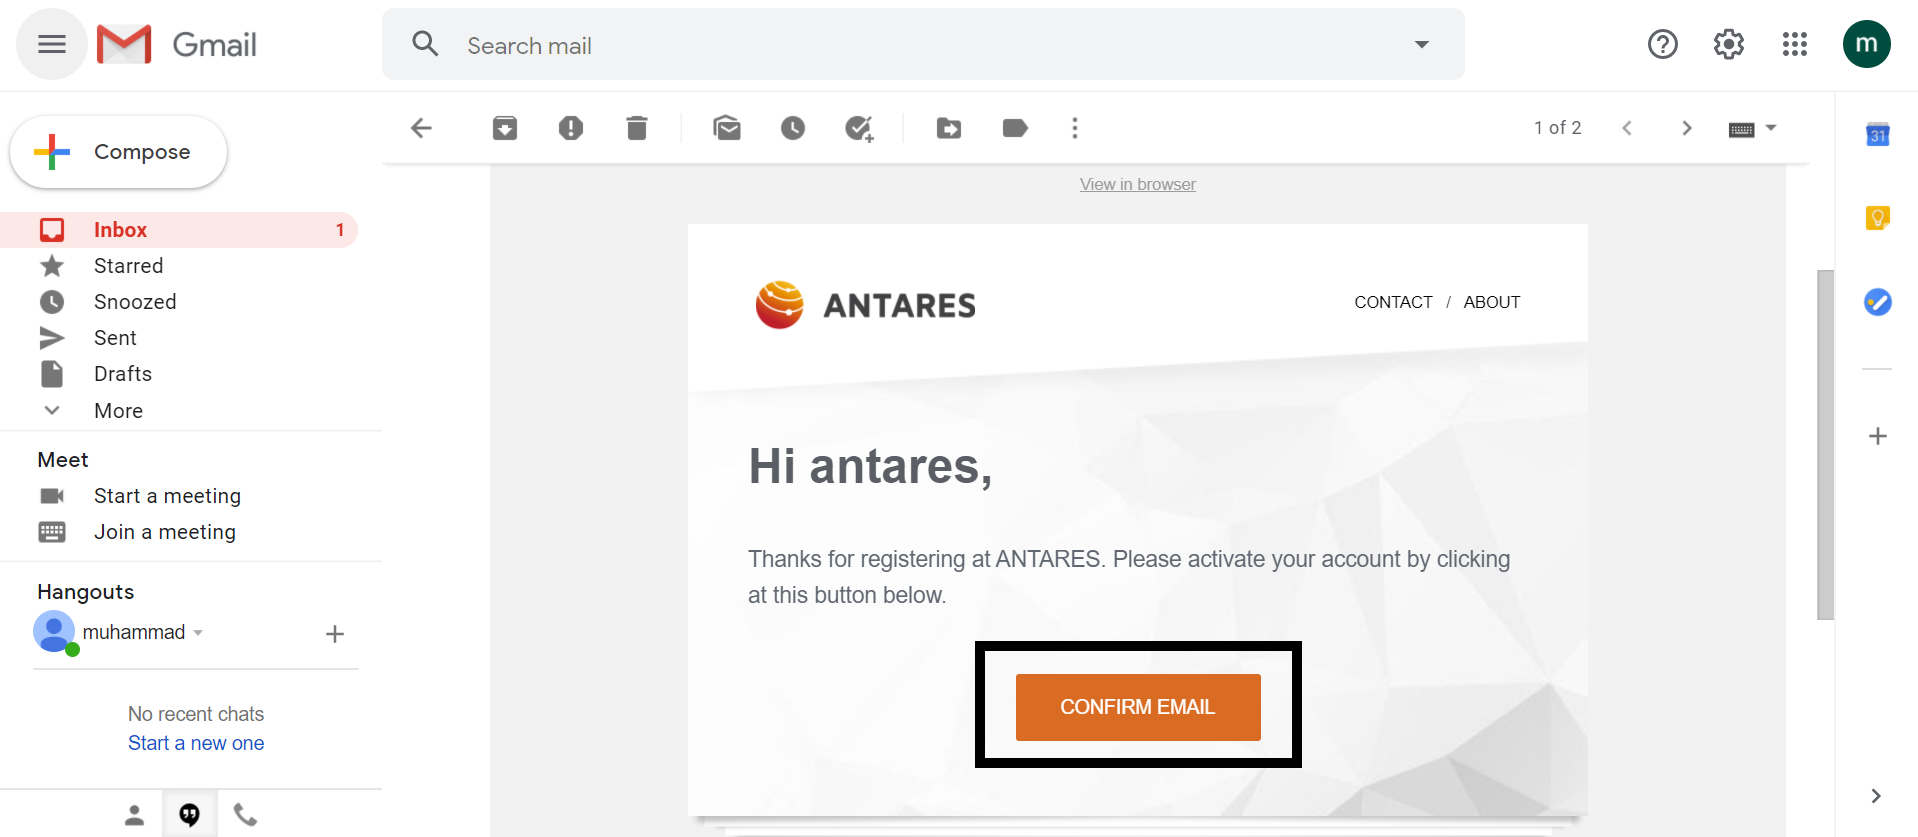
- Selanjutnya buka email untuk verifikasi akun antares.
- Setelah verikasi selesai, Login akun Antares yang telah anda buat
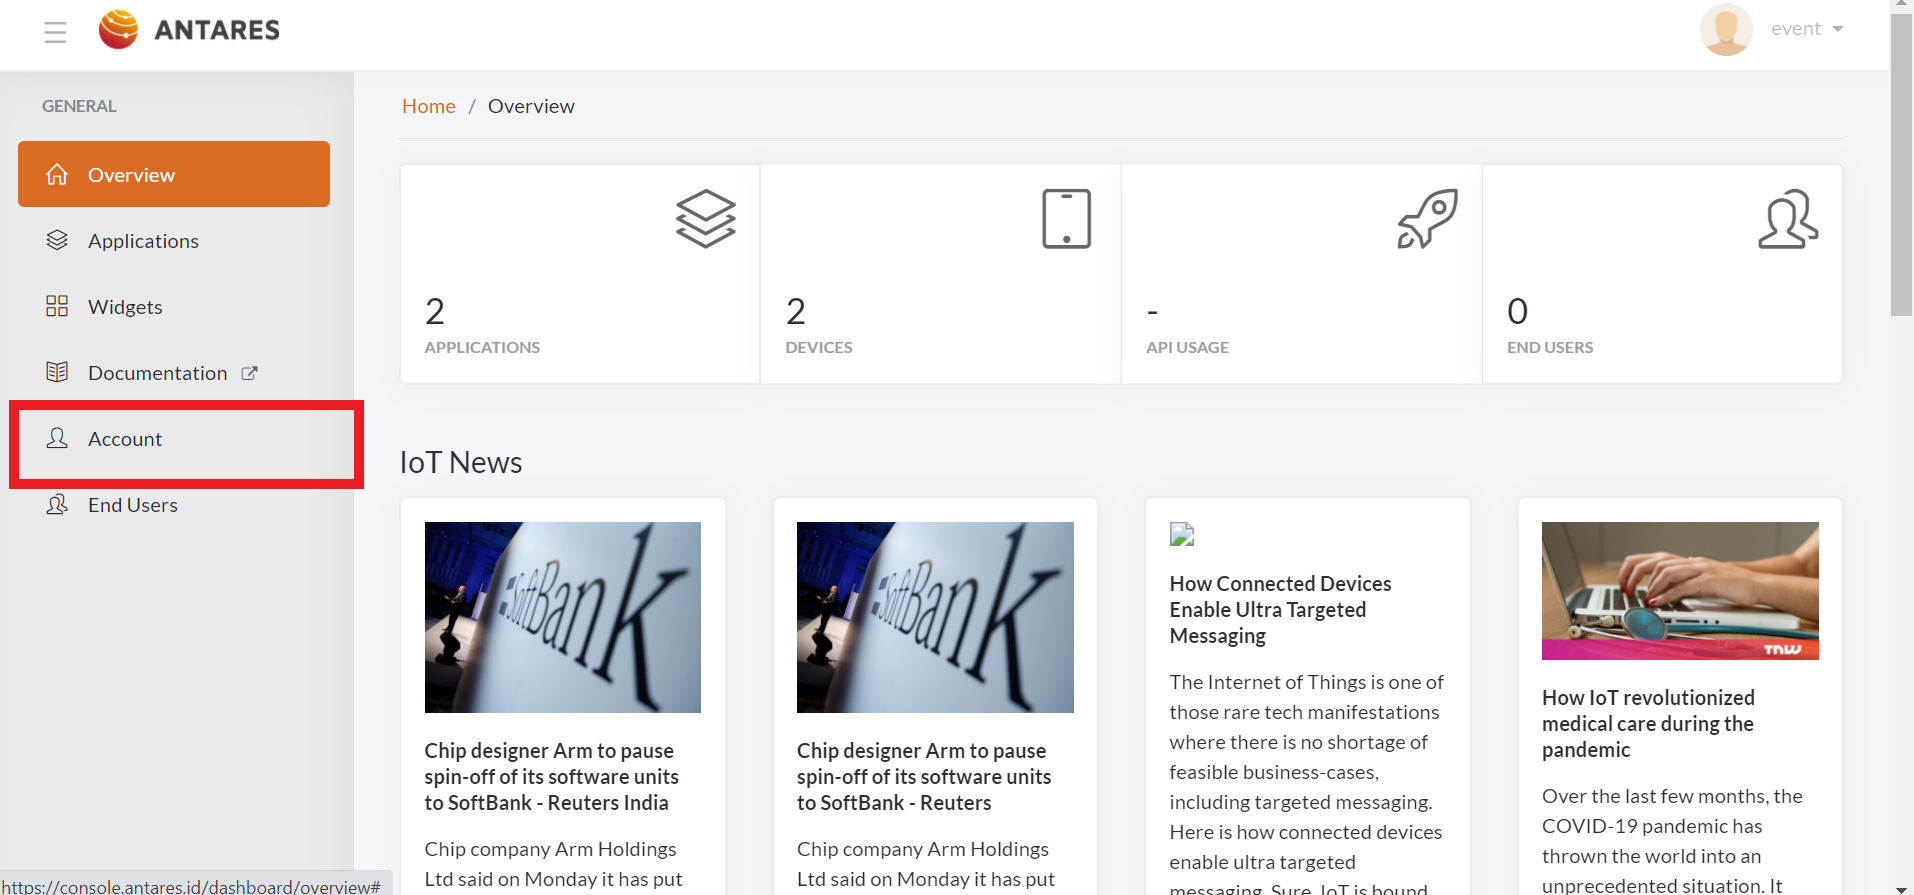
- Setelah login akun Antares Langkah selanjutnya adalah klik account, contoh ditunjukan pada gambar di bawah ini
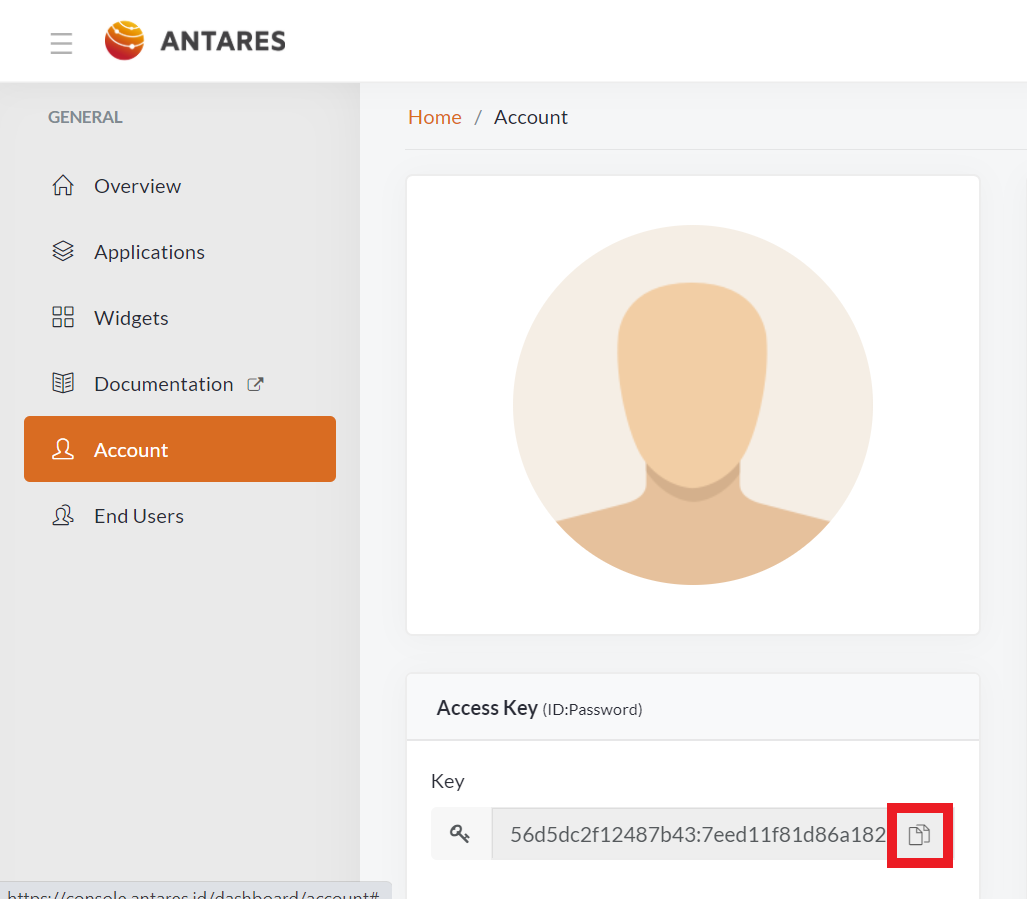
- Setelah klik akun akan muncul Access Key lalu klik save access key untuk menlanjutkan ke Langkah berikutnya
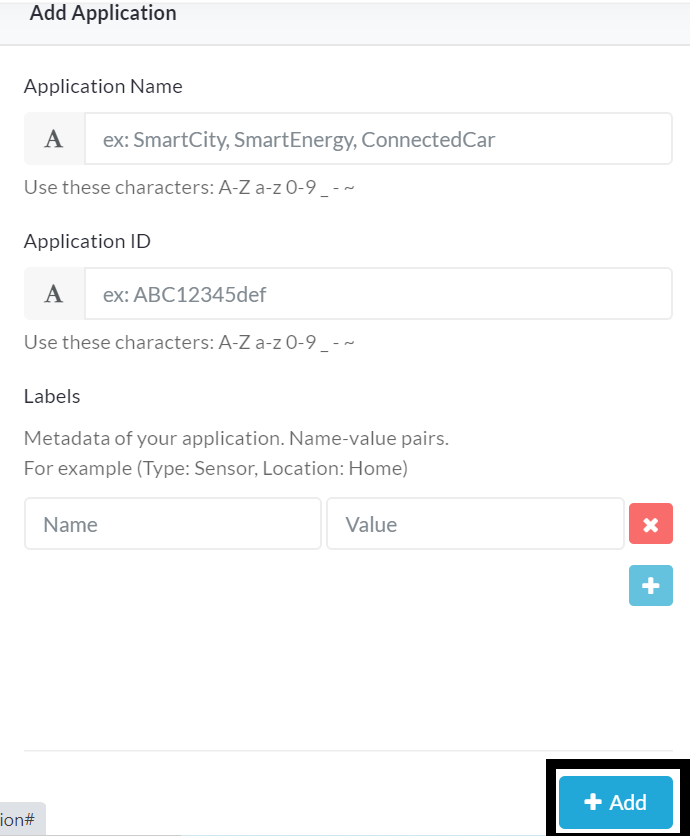
- Buat application, jika anda sudah membuat application, abaikan dan lanjutkan ke proses selanjutnya.
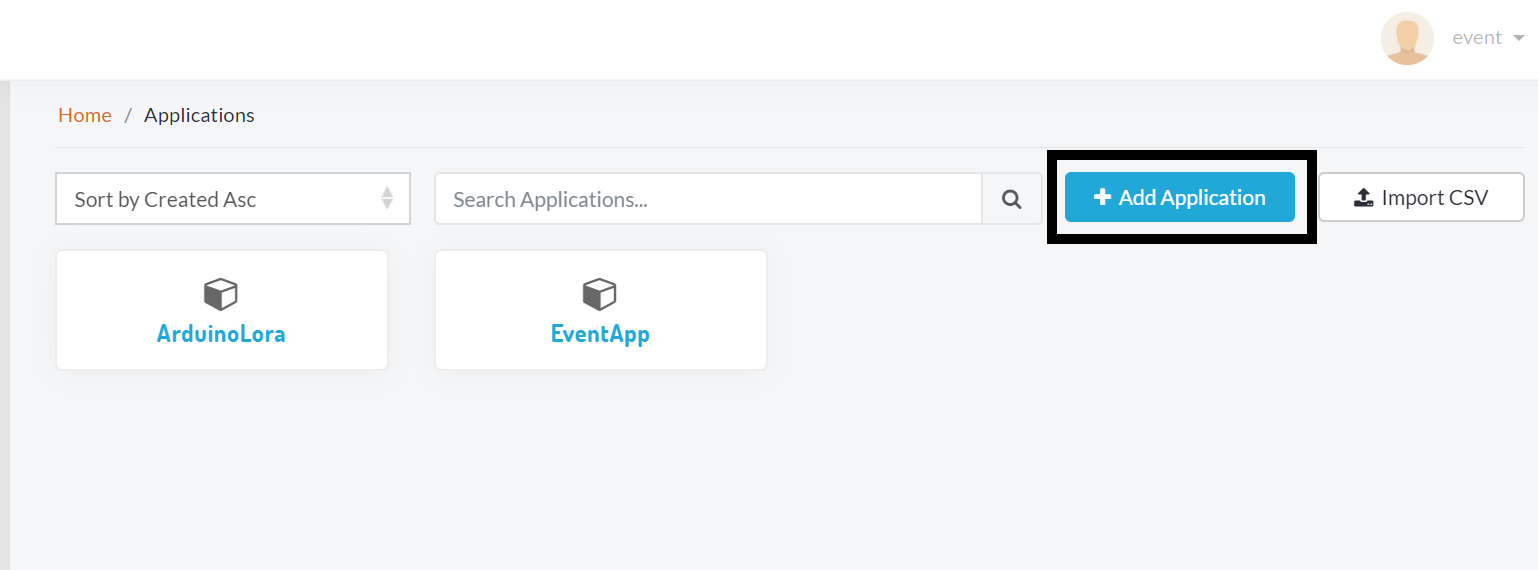
- Selanjutnya klik add untuk mencreate application pada antares platfrom.
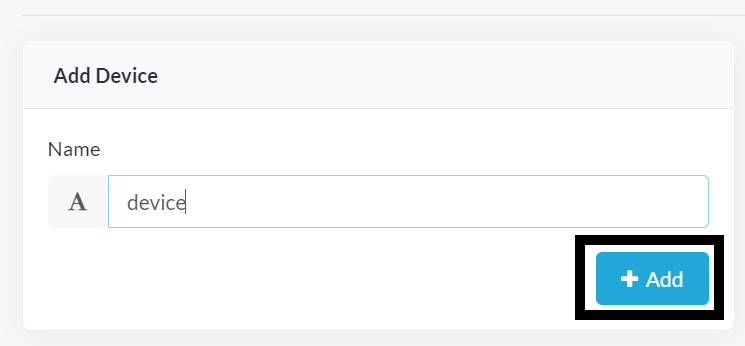
- Buat device, jika anda sudah membuat device anda bisa mengabaikan proses ini dan melanjutkan ke langkah selanjutnya.
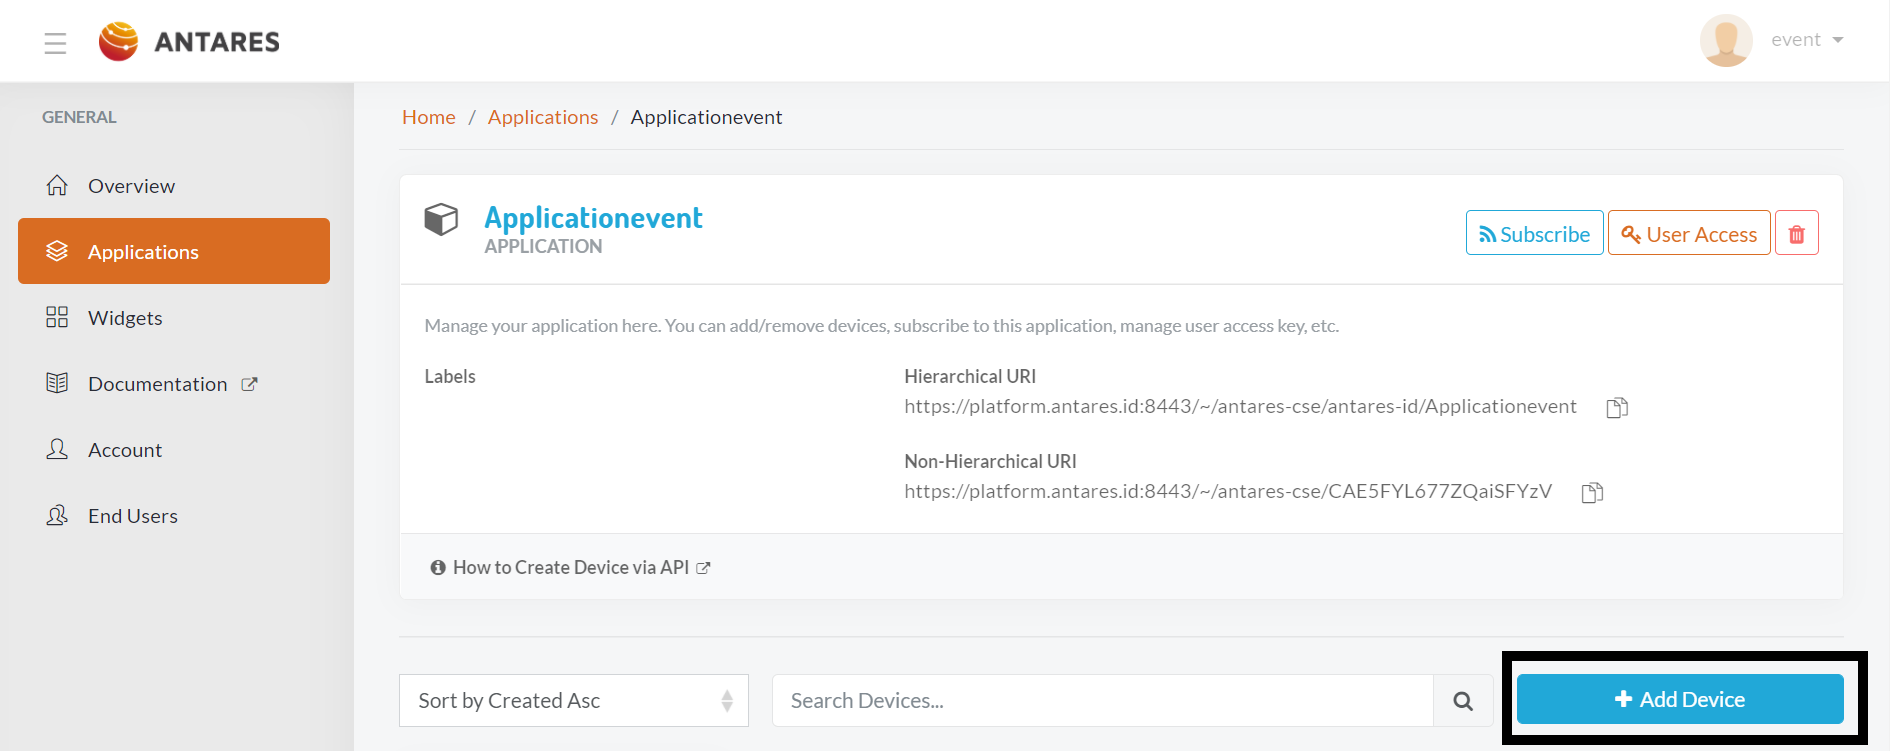
- Selanjutnya klik add untuk mencreate device pada antares platfrom.
Start Apache on XAMPP
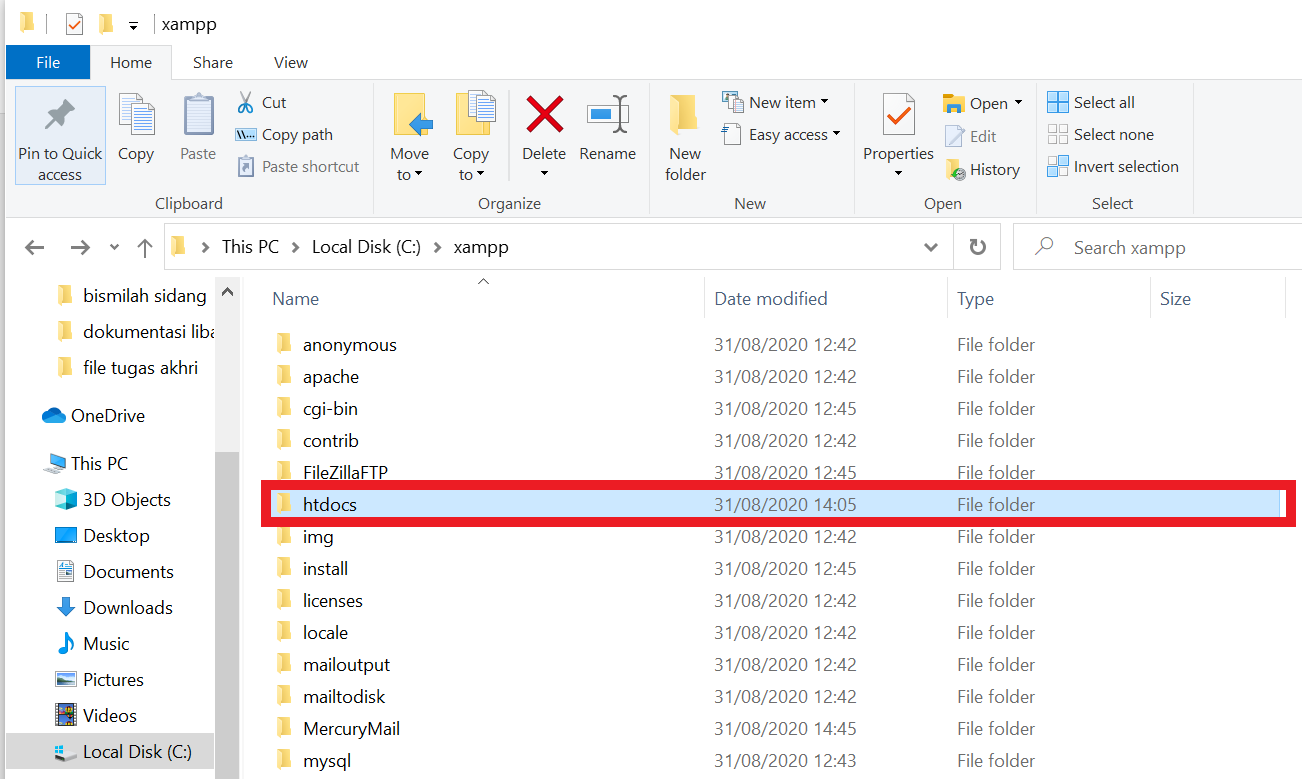
- Selanjutnya extract library php yang sudah di download lalu copy ke C:\xampp\htdocs, pada tutorial ini xampp di install pada direktori C.
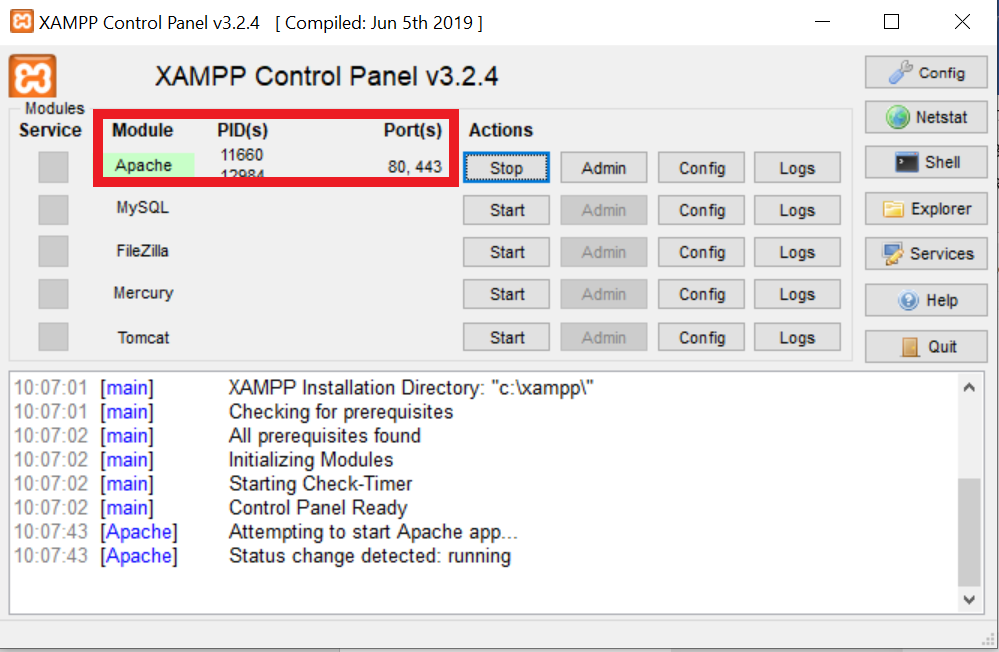
- Selanjutnya buka xampp lalu nyalakan module apache dan tunggu hingga module berwarna hijau, contoh gambar seperti dibawah ini.
Get all Devices on Application with Latest Data
- Buka aplikasi sublime/visualcode/notepad++ lalu drag example.php dan Antares.php yang sudah di copy pada htdocs xampp.
- Selanjutnya gunakan bagian script pada example.php dan juga isikan variable sesuai dengan contoh di bawah ini. Untuk line lainnya bisa di comment terlebih dahulu
require_once('./Antares.php');

Antares::init([
  "PLATFORM_URL" => 'http://platform-iot.unnes.ac.id', // TODO: Change this to your platform URL
  "ACCESS_KEY" => '{{accesskey}}' // TODO: Change this to your access key
]);
try {
  // RETRIEVE DATA
  echo "============================ Retrieve data =================================\n";
  echo "
";
  // get application
  // application name example '/antares-cse/antares-id/example'
  $resp = Antares::getInstance()->get('/antares-cse/antares-id/{{applicationname}}'); // TODO: Change this to your application uri
  if ($resp instanceof AE) {
    echo nl2br("AE: " . $resp->getName() . "\n");

    // list all application's devices
    $cntUris = $resp->listContainerUris();
    echo "Containers: " . count($cntUris) . "\n";
    echo "
";

    foreach ($cntUris as $cntUri) {
      echo "  " . $cntUri . "\n";
      echo "
";

      // get device
      $cnt = Antares::getInstance()->get($cntUri);
      echo "    " . $cnt->getName() . "\n";
      echo "
";

      try {
        // get latest data
        $la = $cnt->getLatestContentInstace();
        echo "      [$la->ct]:$la->rn $la->con\n";
        echo "
";
      } catch (Exception $e) {
        echo "      last data: " . $e->getMessage() . "\n";
        echo "
";
      }
    }
  }
} catch (Exception $e) {
  echo($e->getMessage());
}
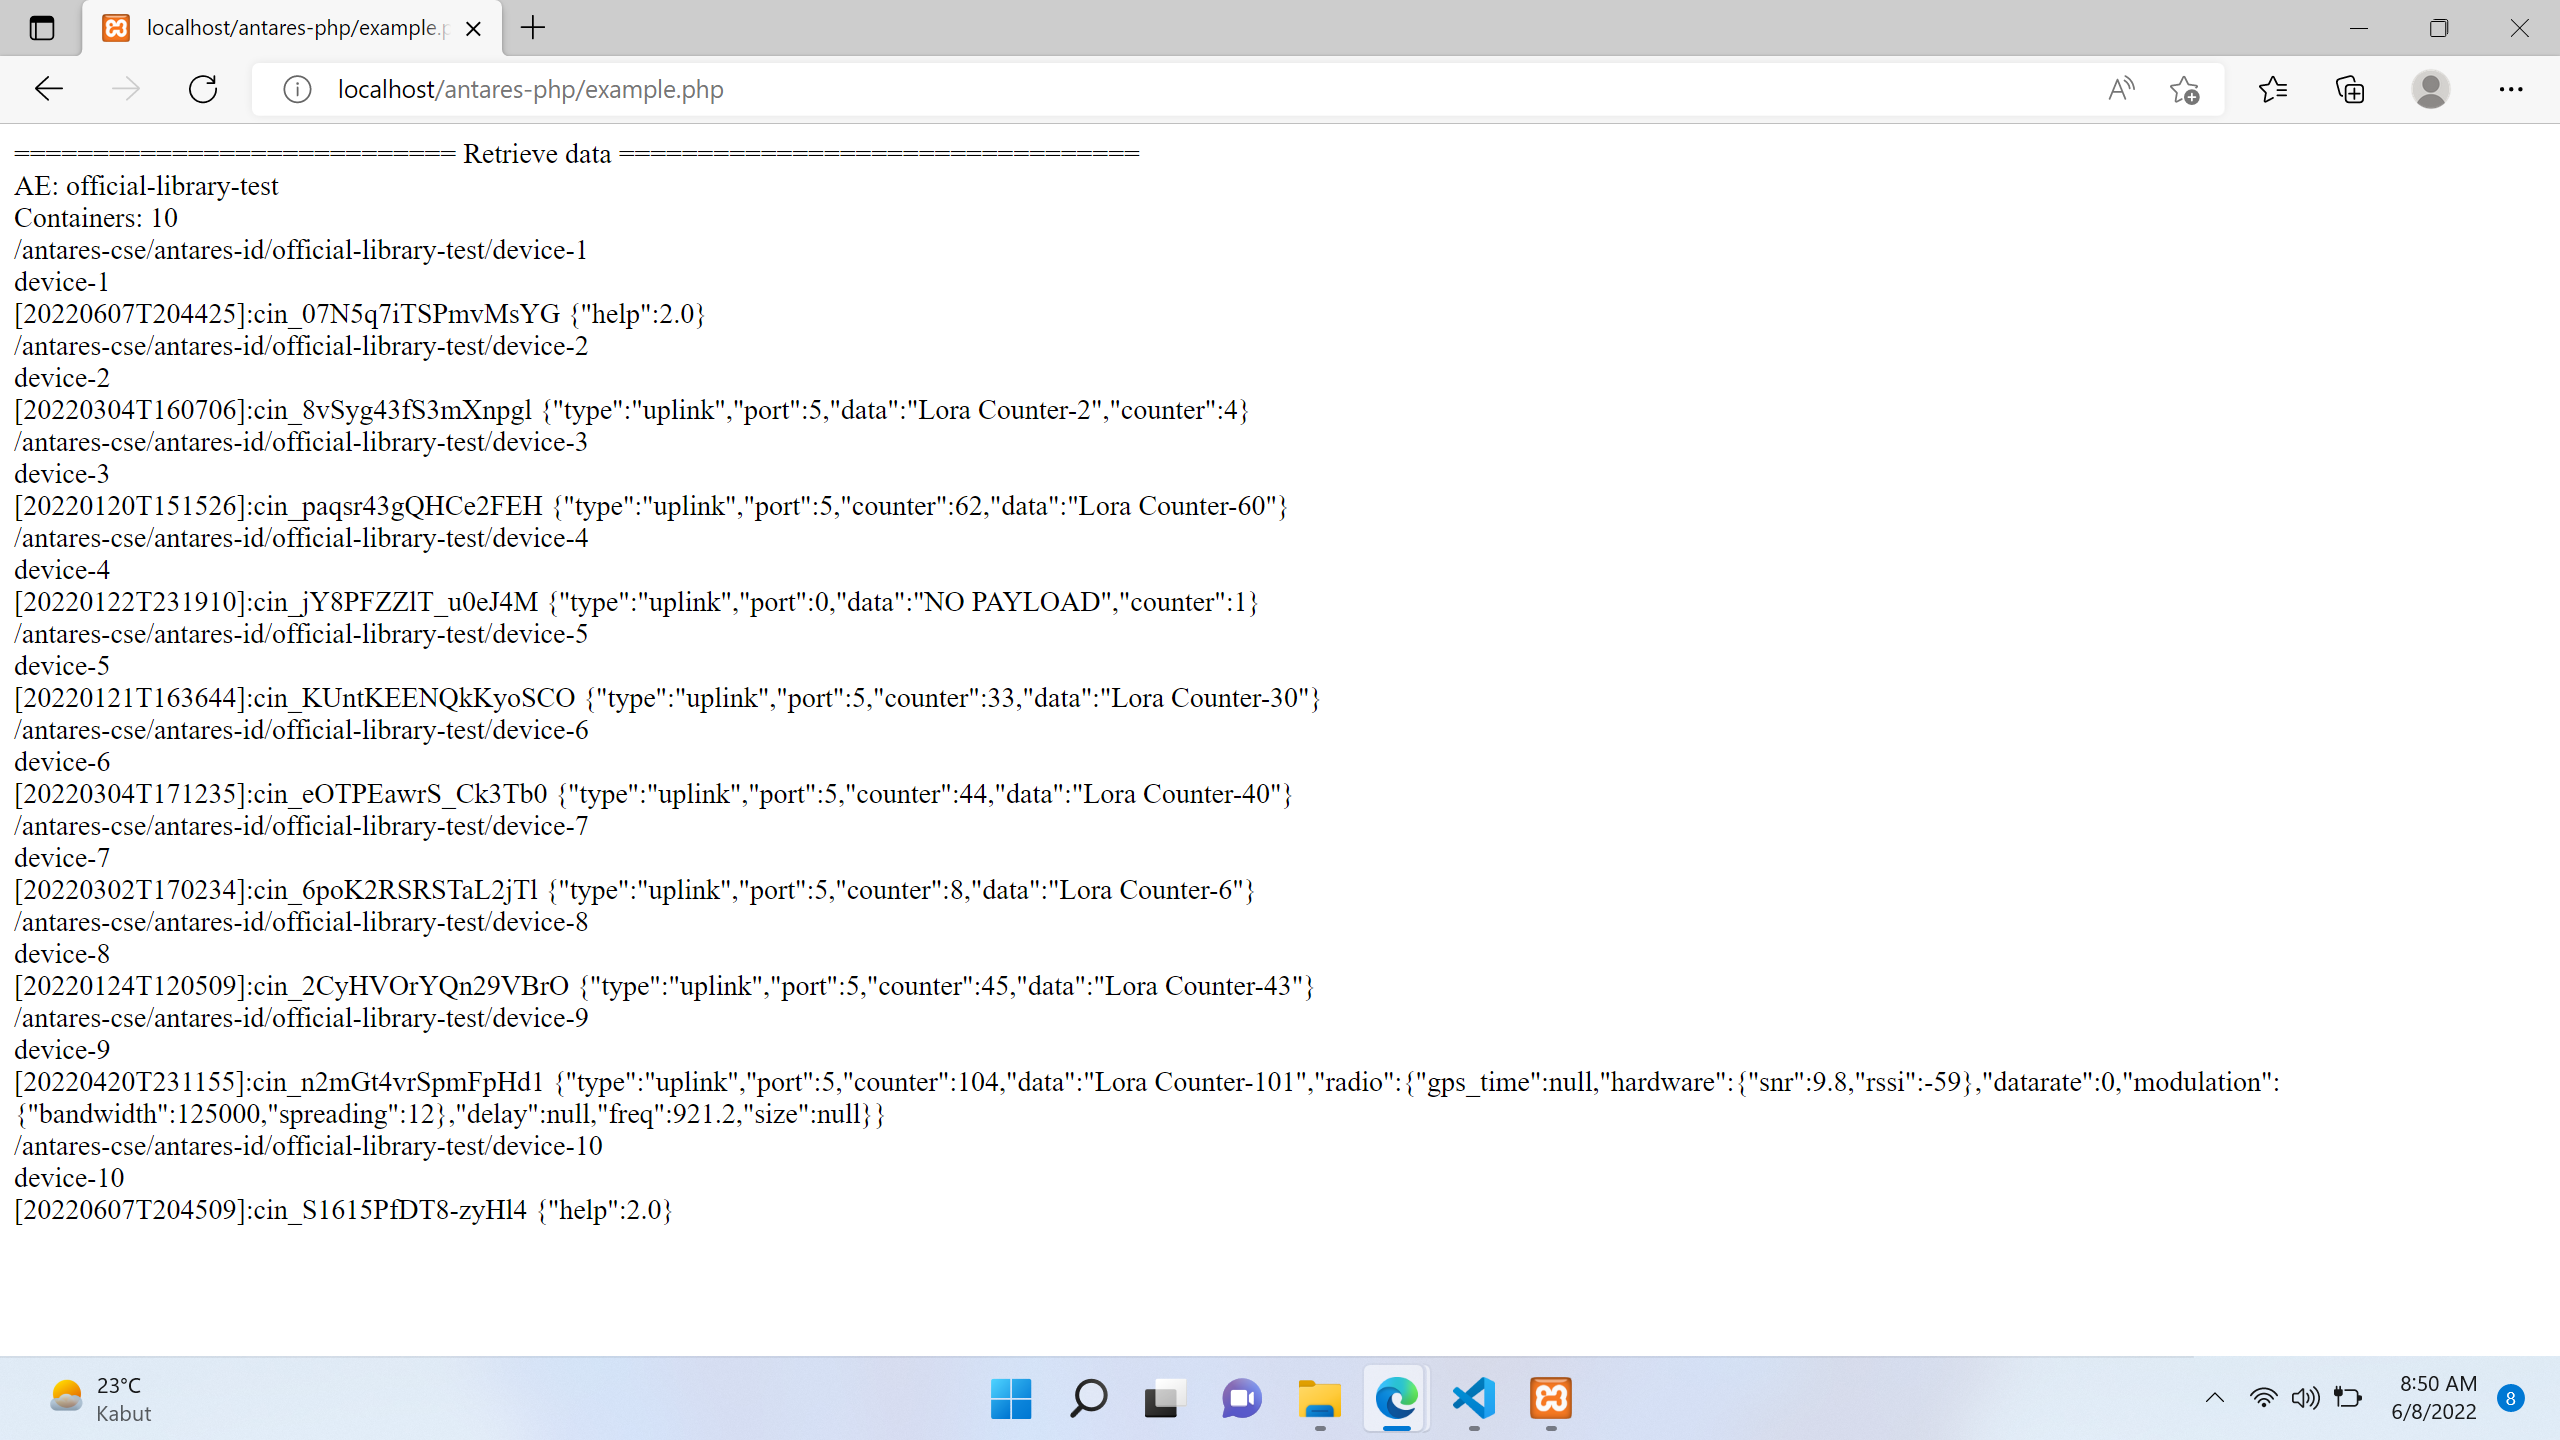
- Langkah selanjutnya buka http://localhost/antares-php/example.php (sesuai folder penyimpanan pada htdocs) pada browser, kemudian akan muncul hasil seperti berikut:
Get Data ID on Devices by Limit
- Buka aplikasi sublime/visualcode/notepad++ lalu drag example.php dan Antares.php yang sudah di copy pada htdocs xampp.
- Selanjutnya gunakan bagian script pada example.php dan juga isikan variable sesuai dengan contoh di bawah ini. Untuk line lainnya bisa di comment terlebih dahulu
require_once('./Antares.php');

Antares::init([
  "PLATFORM_URL" => 'http://platform-iot.unnes.ac.id', // TODO: Change this to your platform URL
  "ACCESS_KEY" => '{{accesskey}}' // TODO: Change this to your access key
]);
try {
  // DISCOVERY LIMIT AND OFFSET
  echo "\n\n";
  echo "
";
  echo "============================ Discovery =================================\n";
  echo "
";
  // application name & device name example '/antares-cse/antares-id/example/example'
  $cnt = Antares::getInstance()->get('/antares-cse/antares-id/{{applicationame}}/{{devicename}}'); // TODO: Change this to your container uri
  $first10 = $cnt->listContentInstanceUris(10);

  // print first10
  foreach ($first10 as $uri) {
    echo $uri . "\n";
    echo "
";
  }
  echo "==============================\n";
  echo "
";
  $next10 = $cnt->listContentInstanceUris(10, count($first10));
  // print next10
  foreach ($next10 as $uri) {
    echo $uri . "\n";
    echo "
";
  }

  $inc = 1;
  echo "==============================\n";
  echo "
";
  $next10 = $cnt->listContentInstanceUris(10, count($first10) * $inc++ + count($next10));
  // print next10
  foreach ($next10 as $uri) {
    echo $uri . "\n";
    echo "
";
  }

  echo "==============================\n";
  echo "
";
  $next10 = $cnt->listContentInstanceUris(10, count($first10) * $inc++ + count($next10));
  // print next10
  foreach ($next10 as $uri) {
    echo $uri . "\n";
    echo "
";
  }


  echo "==============================\n";
  echo "
";
  $next10 = $cnt->listContentInstanceUris(10, count($first10) * $inc++ + count($next10));
  // print next10
  foreach ($next10 as $uri) {
    echo $uri . "\n";
    echo "
";
  }
} catch (Exception $e) {
  echo($e->getMessage());
}
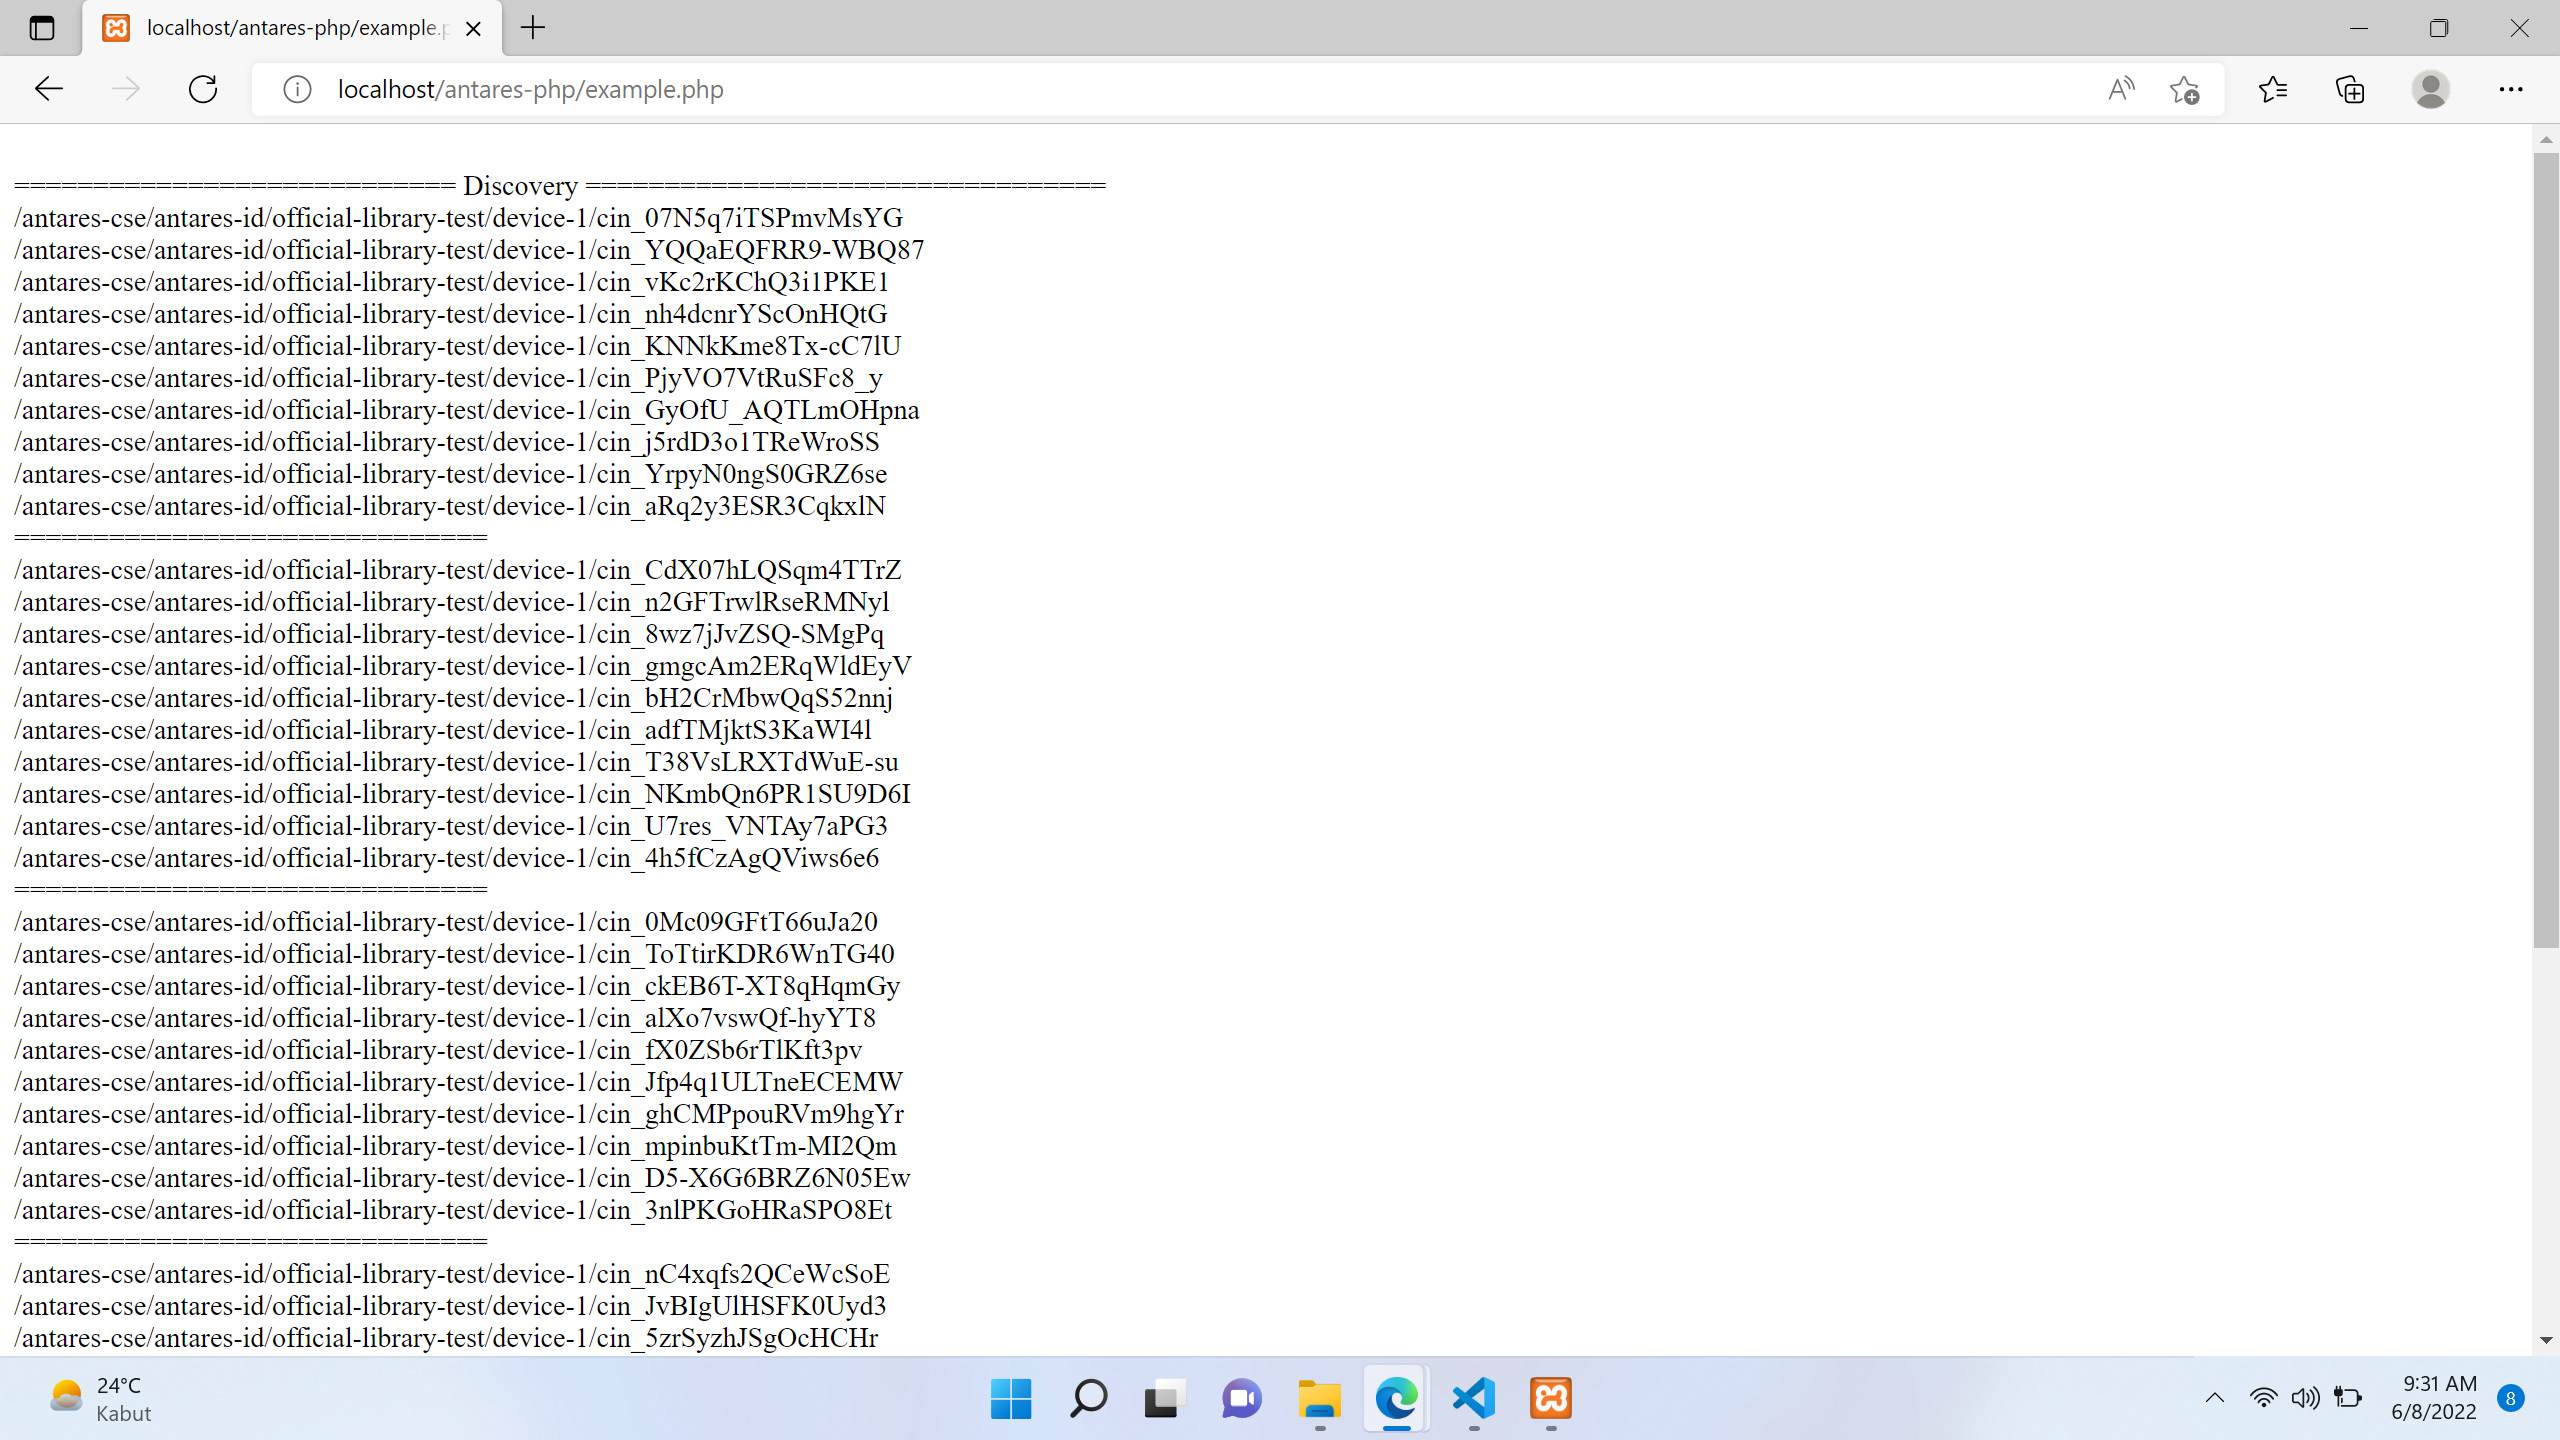
- Langkah selanjutnya buka http://localhost/antares-php/example.php (sesuai folder penyimpanan pada htdocs) pada browser, kemudian akan muncul hasil seperti berikut:
Store Data to Devices
- Buka aplikasi sublime/visualcode/notepad++ lalu drag example.php dan Antares.php yang sudah di copy pada htdocs xampp.
- Selanjutnya gunakan bagian script pada example.php dan juga isikan variable sesuai dengan contoh di bawah ini. Untuk line lainnya bisa di comment terlebih dahulu
require_once('./Antares.php');

Antares::init([
  "PLATFORM_URL" => 'http://platform-iot.unnes.ac.id', // TODO: Change this to your platform URL
  "ACCESS_KEY" => '{{accesskey}}' // TODO: Change this to your access key
]);
try {
  // STORE DATA
  echo "\n\n";
  echo "============================ Insert data =================================\n";
  echo "
";
  try {
    // application name & device name example '/antares-cse/antares-id/example/example'
    $cnt = Antares::getInstance()->get('/antares-cse/antares-id/{{applicationame}}/{{devicename}}'); // TODO: Change this to your container uri
    $lastCin = $cnt->getLatestContentInstace();
    echo "Last CIN: [$lastCin->ct]:$lastCin->rn $lastCin->con\n";
    echo "
";
  } catch (Exception $e) {
    echo "Last CIN: " . $e->getMessage() . "\n";
    echo "
";
  }
  try {
    $cnt->insertContentInstance('{"help":2.0}', 'application/json');
    $lastCin = $cnt->getLatestContentInstace();
    echo "Current Last CIN: [$lastCin->ct]:$lastCin->rn $lastCin->con\n";
    echo "
";
  } catch (Exception $e) {
    echo "Inserting CIN: " . $e->getMessage() . "\n";
    echo "
";
  }
} catch (Exception $e) {
  echo($e->getMessage());
}
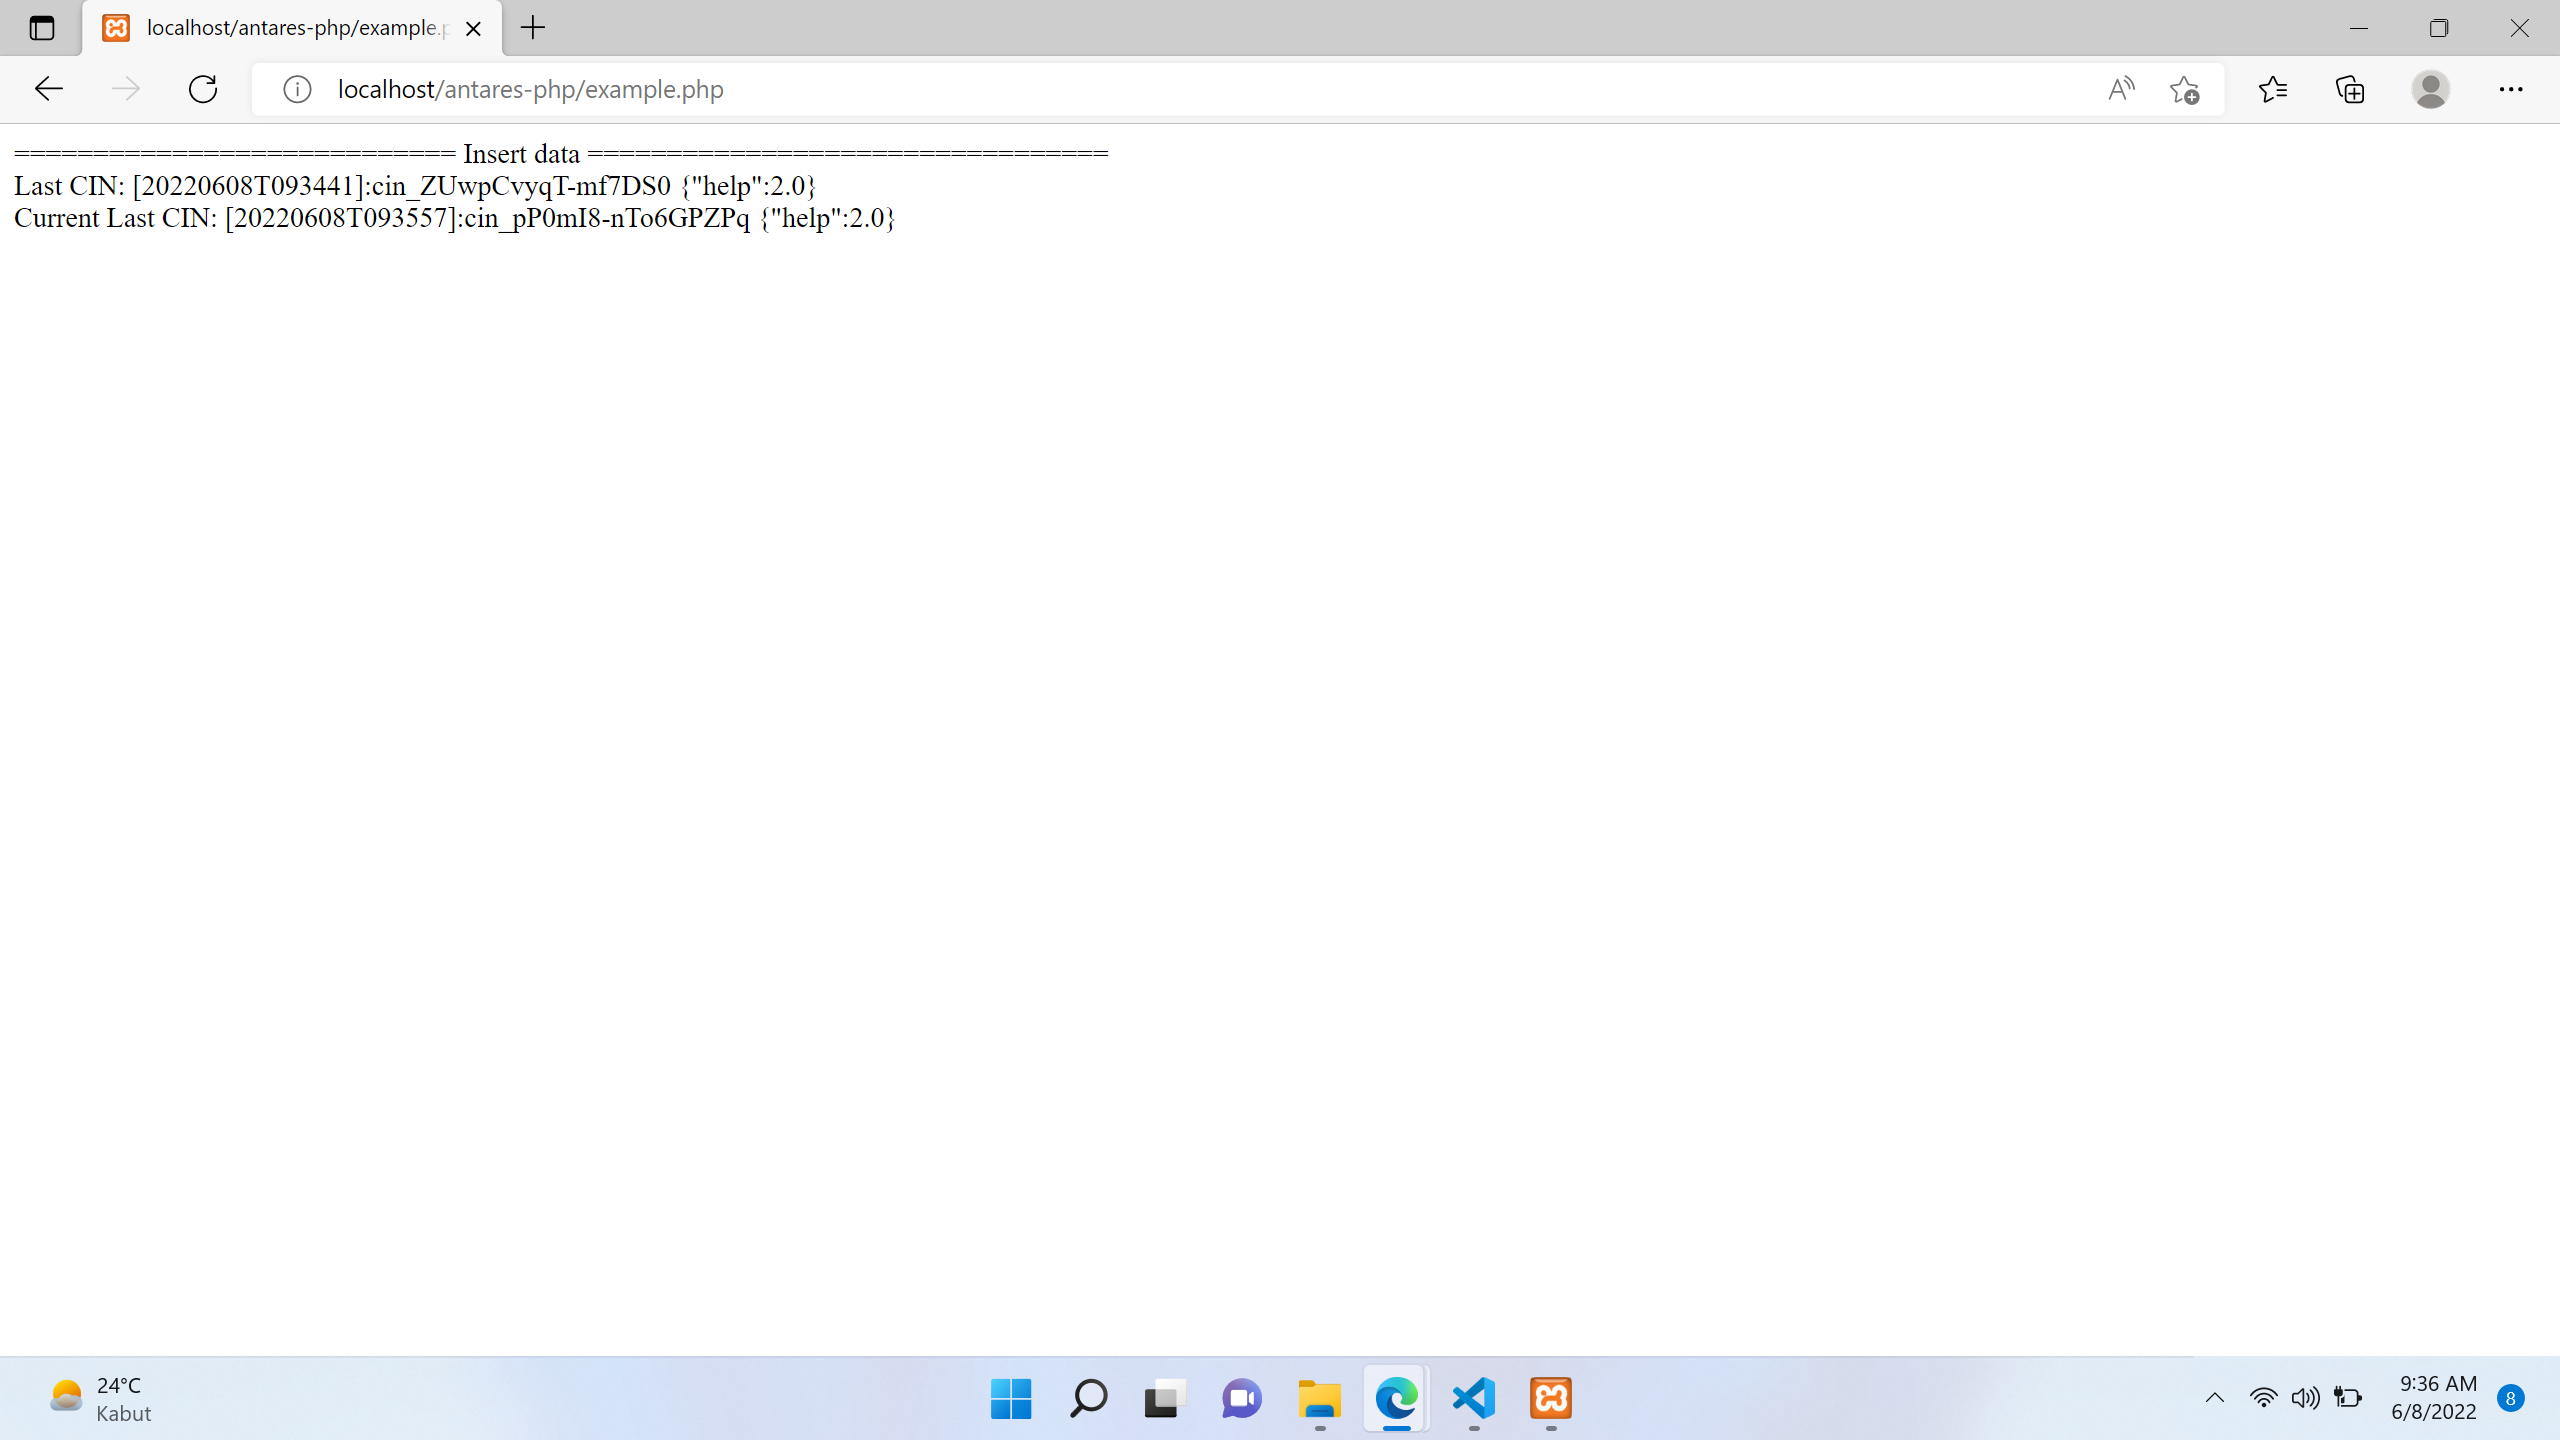
- Langkah selanjutnya buka http://localhost/antares-php/example.php (sesuai folder penyimpanan pada htdocs) pada browser, kemudian akan muncul hasil seperti berikut: